BACKGROUND
Raspberry Pi computers… they are used for many DIY projects and are even used in production environments for various roles from IoT (Internet of Things) to network servers of all kinds. They’re great for small industrial uses as well as IoT applications and the reason why is because they have a small power footprint and no moving parts, making them extremely robust. The Achilles heel however, is the SD card that is used in them! Seemingly, there are many accounts abound that tell tales of card corruption which can bring down a RPi based application.
Being a seasoned Linux user, I noticed one thing that may be to blame: growing logs & swap file usage in /var/swap & /var/log. SD cards have a limited amount of write cycles and when they’re used up, the card will likely need to be binned, and a new one written and replaced. It seems clear that most of the read/write activity seems to be done in the /var directory and so I figure that a better solution to this problem is to setup a USB drive (SSD or thumbdrive), format it for EXT4, and mount it permanently as /var in /etc/fstab. This article will explain how to do just that, and by doing so, you will significantly prolong the life of your sd card! Read on:
SOLUTION
The first thing you will notice when you plug a USB drive into your Pi is that it will most likely be formatted as FAT (we want to change this). You can see the details of your USB drive by running fdisk -l and viewing the output below: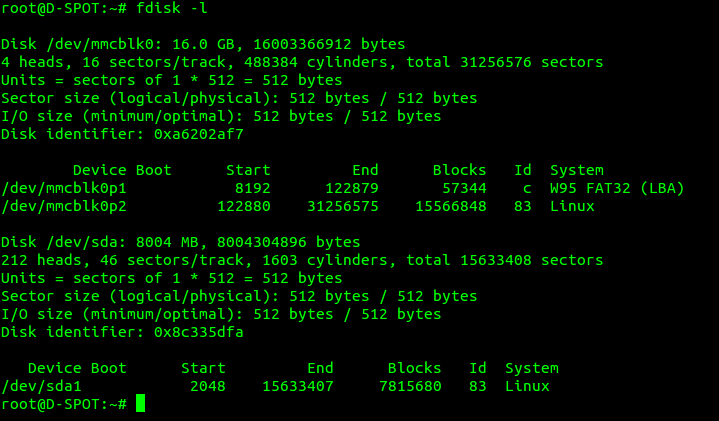
As you can see, in my example, the USB drive is an 8GB size and is already formatted as a “linux” filesystem, but in many cases you would see FAT or NTFS here. Our goal is to delete any partitions on the USB and create a new one that looks like this example. You can use any size drive you want, I recommend 8GB or larger – and larger is always better!
After you have created a single Linux partition on your USB device, you then want to write the changes to the USB and then format it. In this example, the drive is /dev/sda. We want to format the first partition so that partition will be /dev/sda1 and so we will issue the following command once we write the partition and close fdisk:
mkfs.ext4 -L var /dev/sda1 NOTE: be SURE you know which device you are about to format!!! we assume your device will be /dev/sda but it could be different so check when you run fdisk -l. The format can take a few minutes to a while depending on the size of your USB device, so be patient and wait until you are returned to a prompt. Once back at the prompt, you will have a formatted EXT4 partition on your USB device, and you will be ready for the next step, copying your /var directory to the USB.
To copy the contents of /var to your USB, become root or use sudo and then mount the USB to a mountpoint. I suggest we create /mnt/usb and mount to that to keep things simple. execute: sudo mount /dev/sda1 /mnt/usb then you will now be ready to move your /var contents to the USB.
To move your /var contents to the USB execute: mv /var/* /mnt/usb/. NOTE: you may get an error on moving the swapfile, this is OK, do not worry about it. We need to then check /mnt/usb and verify that all our /var stuff is in there by running ls /mnt/usb and you should see the same directories and files in there as you did in /var. You are now ready to setup your USB device as the permanent home for the /var location. To do this, you need to modify /etc/fstab and add an entry to the file showing the usb device mounted as /var as follows (use your favorite text editor – carefully!):
Once you have the fstab file looking similar to this example, you can then save the file, and reboot your Raspberry Pi. When the Pi reboots, it will now mount /var to the USB drive and no longer use the SD card for swap or for logs and log rotation. This will greatly save a huge number of write cycles to your SD card! After you make this change you can also ensure swapping is turned off by running these commands:
sudo dphys-swapfile swapoff
sudo dphys-swapfile uninstall
sudo update-rc.d dphys-swapfile remove
I hope you find this info useful!
Wow – such a great write up. Firstly, it worked. But the clarity of explaining what to do and what was happening was also excellent – a little learning is always a good thing. Also, I saw several other “how to’s” that were immensely more complicated. Being a low/mid-grade hack, this was much appreciated. I have had so many SD cards corrupt over the years (my doing no doubt) – I need a stable implementation for a kiosk I don’t want to have to service often and this is perfect. thanks again Wizworks and K1WIZ for the post
Its just another flash drive with /var on it.
I would have a look at overlayFS as many kiosk mount the whole system in the lower readonly and then use tmpfs or zram for the upper.
Being copy-up COW only writes are in upper but the system just sees the merge of the 2.
I do something similar in https://github.com/StuartIanNaylor/zram-config for any directory bind mount it elsewhere mount a zram drive then place a union at the original directory tree.
Doesn’t require a copy on start and just merge down on stop.
Hack,copy as you wish.
Thank you for your feedback. I will have a look at it. Do you have any projects in which you employed this technique?
Very useful info
I assume since swap is now on the external USB stick, there is no real need to disable swapping
since that will no longer affect the internal flash card?.
I simply made the ext4 filesystem on a new usb stick:
mkfs.ext4 var /dev/sda – this uses the whole stick without creating two partitions!
Then, rather than using ‘mv’ to transfer the files, I used ‘cp’ instead as below, as this leaves the original
files on /var intact, just in case anything goes wrong:
mount LABEL=var /mnt
cp -p -r /var/* /mnt
(note -p is vital, to ensure all files have correct ownership and attributes)
umount /mnt
add var to /etc/fstab as ‘LABEL=var /var ext4 defaults,noatime 0 1 ‘
as this avoids any problems if more than one usb stick is in the pi at boot time