Abstract
Because I have multiple computer systems (servers, desktop/laptops, and embedded home automation devices) I wanted to have a master time source that would work even if my internet connection became unavailable. The best way to achieve this is by using time signals from GPS satellites. Commercial GPS clocks tend to cost upwards in the thousands of dollars. My budget isn’t sized to afford a commercial GPS clock, but I wanted one so I did not have to rely on internet NTP sources should the internet connection fail. Fortunately there are a number of inexpensive GPS modules on the market which allow you to build such a master clock. I had built one of these about 10 years ago but never documented the project, so here I am documenting it now. For this project, you will want a GPS module that offers a PPS (Pulse Per Second) output. This PPS signal allows the NTP server to precisely align the GPS seconds with the rise of the PPS pulse. The PPS signal is read from an available GPIO pin on the Raspberry Pi. Any Raspberry Pi board will do – as long as it is dedicated to this purpose and running no other applications.

Solution
Materials used for this project:
- Raspberry Pi 3B board
- 32GB MicroSD card
- Latest Raspbian OS (Raspbian 11)
- NEO 6M GPS Module with PPS Pin
- PoE HAT for Raspberry Pi (added later)
Preparing the Raspbian OS:
To prepare and install all the needed software run:
sudo apt update
sudo apt dist-upgrade
sudo apt install pps-tools gpsd gpsd-clients gpsd-tools chrony
Now, wire the GPS module to the RPi as follows: (Note: we’re using GPIO 18)
Pin connections:
- GPS PPS to RPi pin 12 (GPIO 18)
- GPS VIN to RPi pin 2 or 4
- GPS GND to RPi pin 6
- GPS RX to RPi pin 8
- GPS TX to RPi pin 10
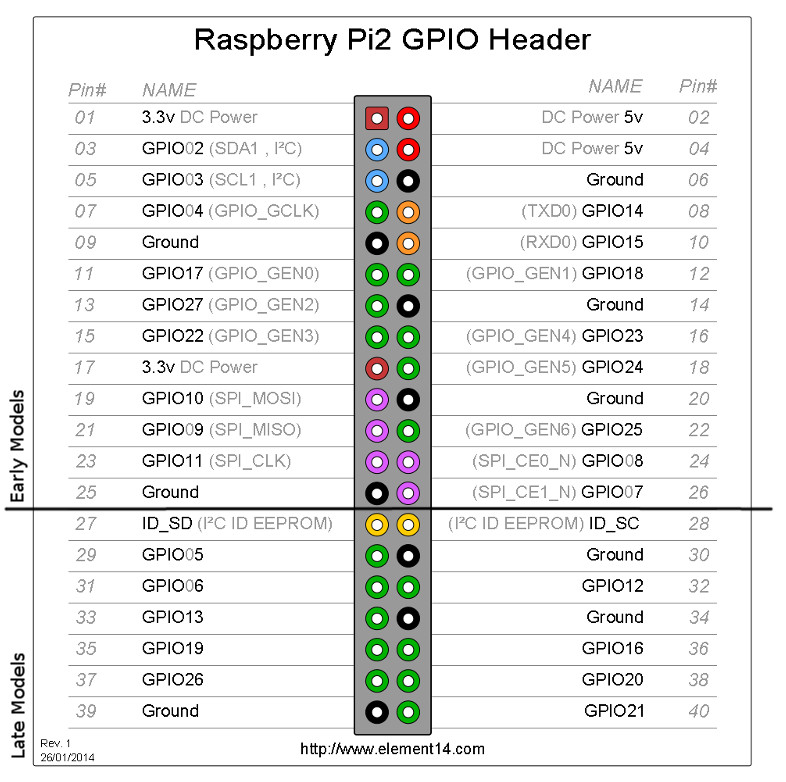
Now, make the following config changes:
sudo bash -c "echo 'enable_uart=1' >> /boot/config.txt
# the next 3 lines are for GPS PPS signals
sudo bash -c "echo 'dtoverlay=pps-gpio,gpiopin=18' >> /boot/config.txt
sudo bash -c "echo 'init_uart_baud=9600' >> /boot/config.txt
# load the pps-gpio module on boot
sudo bash -c "echo 'pps-gpio' >> /etc/modules"
Open the following file and edit as shown below:
sudo vim /etc/default/gpsd


# Devices gpsd should collect to at boot time.
# They need to be read/writeable, either by user gpsd or the group dialout.
DEVICES="/dev/ttyS0 /dev/pps0"

# Other options you want to pass to gpsd
GPSD_OPTIONS="-n"

# Automatically hot add/remove USB GPS devices via gpsdctl
USBAUTO="true"
It’s now time to restart the GPS Clock to allow the above changes. You can test the loading of the pps-gpio module by running:
pi@time:~ $ lsmod | grep pps
pps_ldisc              16384  2
pps_gpio               16384  2
If you see the pps_gpio module returned in the output above, then please proceed. If not, please GO BACK AND CHECK YOUR WIRING!
sudo vim /etc/chrony/chrony.conf


# Include configuration files found in /etc/chrony/conf.d.
confdir /etc/chrony/conf.d

# Put in some reliable NTP backups (these will be fallback sources if GPS signal disappears).
# In my case, I had a GPS module fail after 10 years and without these backups, your clocks
# will wonder!  Lesson learned!
server time-a-b.nist.gov iburst
server time-d-b.nist.gov
server time.windows.com
server time.apple.com

# Enter these two statements to tell Chrony to prefer the GPS time.
refclock SHM 0 delay 0.325 refid NMEA
refclock PPS /dev/pps0 refid PPS

# Set this to whatever subnet you wish to allow to query the GPS clock.  Replace the below
# with whatever is relevant in your environment!  In my example, the following subnet is used
# by my network switches which are NTP peers.  Only the switches sync with the GPS clock and
# network endpoints in other subnets/vlans query the nearest switch for time.
allow 172.30.5.0/24

# This directive specify the location of the file containing ID/key pairs for
# NTP authentication.
keyfile /etc/chrony/chrony.keys

# This directive specify the file into which chronyd will store the rate
# information.
driftfile /var/lib/chrony/chrony.drift

# Save NTS keys and cookies.
ntsdumpdir /var/lib/chrony

# Uncomment the following line to turn logging on.
#log tracking measurements statistics

# Log files location.
logdir /var/log/chrony

# Stop bad estimates upsetting machine clock.
maxupdateskew 100.0

# This directive enables kernel synchronisation (every 11 minutes) of the
# real-time clock. Note that it can’t be used along with the 'rtcfile' directive.
rtcsync

# Step the system clock instead of slewing it if the adjustment is larger than
# one second, but only in the first three clock updates.
makestep 1 3

# Get TAI-UTC offset and leap seconds from the system tz database.
# This directive must be commented out when using time sources serving
# leap-smeared time.
leapsectz right/UTC
Now that you have completed the above, it’s time to restart the Chrony service:
sudo systemctl restart chronyYou can now check to see if the GPS is working:
sudo cgpsYou should see output like:

Note the “Status” line. Having a 3D GPS fix is good, it indicates a solid fix and therefore reliable time.
If you are getting the above output, your GPS should be working and chrony should be serving time to your network. You can check to see if chrony is getting time from the GPS:
sudo chronyc -n sources


MS Name/IP address         Stratum Poll Reach LastRx Last sample
===============================================================================
#- NMEA                          0   4   377     7   +141ms[ +141ms] +/-  163ms
#* PPS                           0   4   377     9   -185ns[ -427ns] +/-  312ns
^- 132.163.96.1                  1   7   377    72  -1348us[-1348us] +/-   24ms
^- 132.163.96.4                  1   8   377   111  -1386us[-1387us] +/-   24ms
^- 168.61.215.74                 3  10   377   676  +5834us[+5900us] +/-   59ms
^- 17.253.20.125                 1   7   377    23    -66us[  -66us] +/- 3640us
In the above example, the time source with the asterisk (*) is the preferred in-use time source. The hash (#) indicates that the listed time source is a locally attached time source, while the carrot (^) indicates that the time source is remote. Here you can see that the GPS PPS time source has a better accuracy in NANOSECONDS!
Harden The Clock
At this point, it is a good idea to now enable an overlay filesystem to preserve your MicroSD card. This will ensure that no more writing occurs and that if the GPS clock loses power suddenly, that the card will not get corrupted. To do so please do the following:
sudo raspi-configSelect Performance Options:

Then Overlay File System:

Choose YES to enable the overlay filesystem, then YES to make the /boot partition READ ONLY! At this point, you can safely power cycle the GPS clock and it should reboot and continue working automatically. Be sure to place the antenna in view of the sky. If you are using an internal antenna, place the GPS clock near a window.
