So I wanted to start using the ATTiny85 MCU for making smaller projects where I only need a minimum of components and functionality. The cost of a single Tiny85 is much less than its larger ATmega cousins.
The mcu offers a small footprint and will also run directly off a 5v DC source. I used one in a candle project to create a flickering LED that behaves like a true candle. This chip is perfect for a small simple project like that. Unfortunately, figuring out how to program one using Arduino IDE on Linux, was a bit of a task and required a fair amount of googling to many places. I’m putting all the info I found in this writeup in the hopes it saves people time. Here’s how to get started:
Buy a TinyAVR programmer:

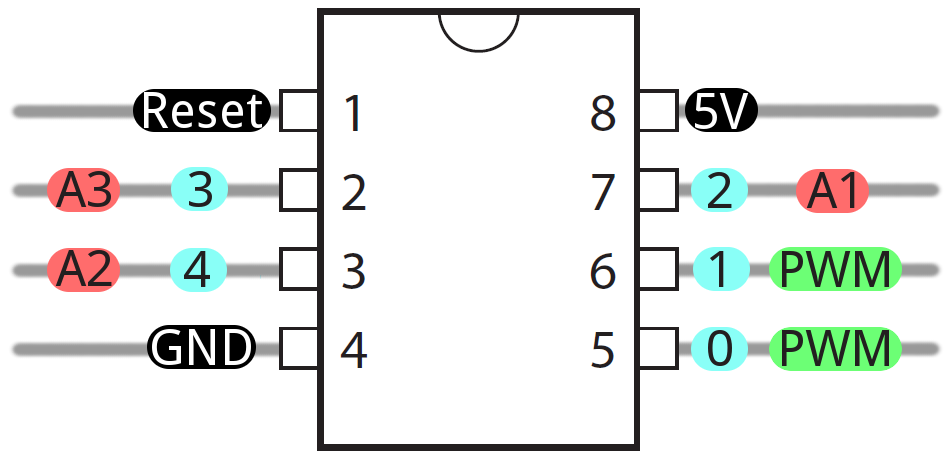
You should be able to get one for about $20. The ATTiny85 mcu chips can be had as low as $1.66 on mouser or digikey and look like this:

Here’s how to setup your linux (ubuntu) machine to program these babies:
- Download and install Arduino IDE from the official website (as per Sparkfun instructions)
- Download ATtiny Addon, find hardware/ folder of your Arduino installation and copy attiny content there (as per Sparkfun instructions)
- Launch Arduino IDE
- Plugin the Tiny AVR programmer with ATtiny85 already inserted (check the polarity as per Sparkfun instructions!)
- Good news — you are on Linux! The device is recognized automatically, no USB driver installations are necessary
- Check that the device is discovered:
$ sudo lsusb | grep -i usbtiny
Bus 001 Device 033: ID 1781:0c9f Multiple Vendors USBtiny
(in my case, note: Bus 001 Device 033, your mileage may vary)- Note the device’s ‘Bus’ and ‘Device id’, we will use it to allow all users a permission to write to this device (otherwise, your uploads will fail on Linux since you have no permission to write to the device). In my case, the command is:
$ sudo chmod 666 /dev/bus/usb/001/033- Copy/paste the simple blinking sketch into Arduino IDE (as per Sparkfun instructions). Don’t upload the sketch yet!
- In the menu “Tools”, pick the following:
* "Board" -> "ATtiny"
* "Processor" -> "ATtiny85"
* "Clock" -> "1 Mhz (internal)"- Click “Upload” for your sketch (The first time, it will pop-up a window asking you where to save the sketch)
- Congratulations! Once upload is done — you should now see the LED that is blinking every half a second!