Background
So I have setup a combination of things as part of a multi-faceted defense for this site. It has been a learning exercise for me for sure. Here’s an example where knowledge is power, power to stay on the air. Most of the time, we get scanned by bots, many of which are the type that are scanning for vulnerabilities. I employ the following technologies in layers of defense:
- Cloudflare
- Nginx (reverse proxy)
- Fail2ban (installed on reverse proxy machine)
- apache origin servers
Solution
To implement these layers, I wanted to install fail2ban and have it track visitor IPs but specifically look for 4xx errors and if found more than two times, have it inform cloudflare to block that IP for 30 days. I’m taking the bet that chances are that legitimate visitors will not be looking for things that don’t exist, or forbidden URLs like wp-admin, wp-login, etc. In those cases, fail2ban will be configured to add those IPs to an IP Block list on cloudflare’s WAF (Web Application Firewall).
First, let’s install fail2ban:
sudo apt install fail2ban -yNext, we need to setup fail2ban by editing the following files:
/etc/fail2ban/filter.d/nginx-4xx.conf (create the file)
[Definition]
failregex = ^<HOST>.*"(GET|POST).*" (404|444|403|400) .*$
ignoreregex =/etc/fail2ban/jail.conf, and add these lines:
[nginx-4xx]
enabled = true
port = http,https
logpath = /var/log/nginx/access.log
maxretry = 2
findtime = 1d
bantime = 30d
action = cloudflare
    iptables-allports
Update /etc/fail2ban/action.d/cloudflare.conf:
cd /etc/fail2ban/action.d
rm cloudflare.conf
wget https://raw.githubusercontent.com/fail2ban/fail2ban/master/config/action.d/cloudflare.conf
Configure the file by only changing these TWO things:
cftoken = sd9cds7yshc7sdy8dsyc9sd7hc7ds    # your API-Token
cfuser = [email protected]
Finally, you need to modify nginx config to log the actual visitor IPs so that nginx logs the actual visitor IP. You first need to tell nginx about the CIDR IP subnets that cloudflare uses by visiting:
https://www.cloudflare.com/ips-v4 (for ipv4 addresses)
https://www.cloudflare.com/ips-v6 (for ipv6 addresses)
Next, add these IPs to a conf file: /etc/nginx/conf.d/nginx-realip.conf (good idea to keep this list updated!)
set_real_ip_from 173.245.48.0/20;
set_real_ip_from 103.21.244.0/22;
set_real_ip_from 103.22.200.0/22;
set_real_ip_from 103.31.4.0/22;
set_real_ip_from 141.101.64.0/18;
set_real_ip_from 108.162.192.0/18;
set_real_ip_from 190.93.240.0/20;
set_real_ip_from 188.114.96.0/20;
set_real_ip_from 197.234.240.0/22;
set_real_ip_from 198.41.128.0/17;
set_real_ip_from 162.158.0.0/15;
set_real_ip_from 104.16.0.0/13;
set_real_ip_from 104.24.0.0/14;
set_real_ip_from 172.64.0.0/13;
set_real_ip_from 131.0.72.0/22;
set_real_ip_from 2400:cb00::/32;
set_real_ip_from 2606:4700::/32;
set_real_ip_from 2803:f800::/32;
set_real_ip_from 2405:b500::/32;
set_real_ip_from 2405:8100::/32;
set_real_ip_from 2a06:98c0::/29;
set_real_ip_from 2c0f:f248::/32;

real_ip_header    X-Forwarded-For;
After saving the file, you can then restart nginx to adopt the new config:
sudo systemctl restart nginxCheck your access logs, and if you see actual visitor IPs and not the cloudflare IPs, then you are good to start fail2ban and start autoblocking offenders. If you DO NOT see the actual visitor IPs, please STOP and figure out why and check your config before starting up fail2ban.
Startup fail2ban:
sudo systemctl start fail2banOnce fail2ban has started, you can check the jail status:
fail2ban-client status nginx-4xxYou should see output like:
Status for the jail: nginx-4xx
|- Filter
|  |- Currently failed: 125
|  |- Total failed:     274
|  `- File list:        /var/log/nginx/access.log
`- Actions
   |- Currently banned: 27
   |- Total banned:     27
   `- Banned IP list:   157.55.39.86 82.159.143.67 157.55.39.134 2607:fb90:758f:c8e:416a:7b5d:8948:3501 40.77.167.57
207.46.13.87 157.55.39.142 207.46.13.26 46.161.14.84 62.233.50.75 162.55.85.228 78.138.51.146 14.29.229.160 23.236.20
4.0 5.165.48.72 152.89.196.13 164.90.194.36 192.198.118.207 31.31.65.148 2a03:2880:20ff:6::face:b00c 2a03:2880:20ff:b
::face:b00c 2a03:2880:13ff:12::face:b00c 2a03:2880:20ff::face:b00c 185.252.147.128 14.29.175.111 66.249.66.128 175.17
8.160.253
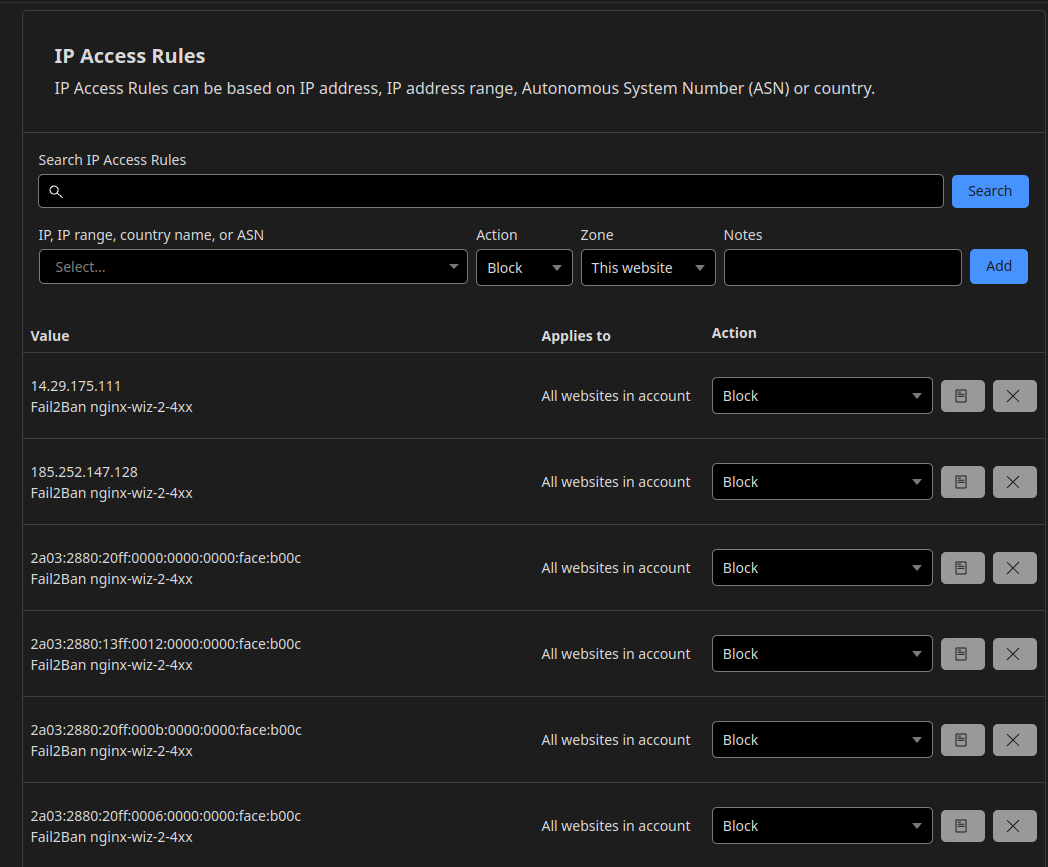
As you can see in the above example, fail2ban is now blocking IPs and informing cloudflare:
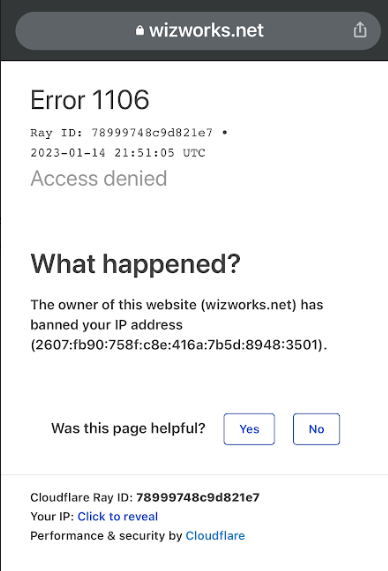
If someone ends up on the black list, they will see: (after 30 days, the IP will be released automatically from the cloudflare IP Block list)